Tuesday, January 26, 2010

Chicken Florentine Ravioli - My First Pass!

This past weekend I decided to pull out the pasta maker, complete with the ravioli attachment, and try my hand at making ravioli. The flavor of choice? Chicken Florentine, of course!

First thing to do was make the pasta dough which is great fun! I must say I love rolling the dough through the pasta maker, watching the texture get more perfect with each roll!

Here is a basic dough recipe worth trying!

1 egg, beaten
1/2 teaspoon salt
1 cup all-purpose flour
2 tablespoons water

Directions:
In a medium sized bowl, combine flour and salt. Make a well in the flour, add the slightly beaten egg, and mix. Mixture should form a stiff dough. If needed, stir in 1 to 2 tablespoons water.

On a lightly floured surface, knead dough for about 3 to 4 minutes. With a pasta machine or by hand roll dough out to desired thinness. Use machine or knife to cut into strips of desired width.

If you've never made homemade pasta before, take a look at this web page. Very good information!

http://allrecipes.com/HowTo/Making-Pasta-Dough/Detail.aspx

Beware, once you make pasta yourself, you will probably never buy it in the store again! The freshness of the homemade pasta just can't be beat!! You can make noodles without owning a pasta maker, however, I must say having this nifty little kitchen gadget does make the work a bit easier! And it's loads of fun!!

For the filling:
1 c. (4 oz.) ground cooked chicken
10 oz. fresh spinach, cooked, drained and chopped
3 tbsp. butter, melted
3 tbsp. Parmesan cheese
1/4 tsp. salt
1/8 tsp. ground nutmeg
Dash of pepper

Combine chicken, spinach, and melted butter. Stir in cheese, salt, nutmeg, and pepper. Set aside.

So the dough is ready and the filling is ready. Now to make the ravioli. Instead of hand cutting the ravioli, I tried using the ravioli attachment for my pasta maker. I was not that successful with it, I have to say and decided that when I make ravioli again, I will roll the dough, cut the dough, fill the ravioli and crimp the edges myself. I think, in the end, it will be less work and aggravation!

When your ravioli squares are complete using either method, cook ravioli in large pot of rapidly boiling salted water for 7 to 8 minutes or until tender. Rinse in cold water and drain well. Place in bowl and pour your favorite warmed marinara sauce over it. Sprinkle with fresh grated Parmesan cheese.

Even though I had difficulty with the ravioli attachment, my efforts weren't totally wasted as I did get three very wonderful meals out of the experience. Plus I learned more about making pasta! And I have left-over noodles, perfect for that next batch of lasagna!!

Now, doesn't that bowl of ravioli look delicious? Trust me, it was! Add a Caesar Salad and warm garlic bread and you've got a meal!

Try making your own pasta at least once, you won't be disappointed.
Pin It

Saturday, January 23, 2010

The Raw Diet

Most everyone knows I feed raw to my Greyhounds. Actually, I feed half kibble and half raw. For kibble, it's Innova Evo which is the next best thing to feeding raw, in my humble opinion. It's grain-free and is high protein and high fat. This is their morning meal. For their evening meal, I usually feed raw chicken backs which typically have some organ meat still attached so they are getting those nutrients as well. I mix up the chicken backs with turkey necks (once a week), beef heart, mackeral, beef liver, ground beef, ground chicken, ground rabbit, chicken livers, stew meat, etc. It's all raw - not cooked.

One day I'm going to get my courage up to get some chicken feet. I know, it's disgusting, but they are suppose to be great for their teeth and they usually love 'em! Oh, and they also get fruit regularly and frozen veggie glop which has a mixture of veggies, cottage cheese, and raw eggs!! When I'm baking and have egg shells left over, they get those, too!! Yep, it's okay to feed all these things and typically your dog will flourish. They love all of it and if kibble weren't around, this is what they would eat! And they have the whitest teeth and freshest breath!!

So, yesterday it was time to stock back up on chicken backs. I get these at a place in Marietta called Tip Top Foods. They charge $14 or so for 40 pounds. I purchased two 40 pound cases and the total was $32. And for the first time, I purchased a 40 pound case of turkey necks for $21. All of this will last 2-3 months for four Greyhounds, again, just feeding the evening meal. How long all that will last depends on how much of the other I slide in on a weekly basis! And that depends on what I can get and at what price!

Once I got home from Tip Top, I carried the cases (one by one) into the kitchen and began the tedious task of separating and bagging up the chicken backs and then the turkey necks. Then I tossed everything into the small deep freezer in the garage. Done!

It's not fun, that's for sure, but I know that what I'm doing benefits the girls so much. Their health is my most primary concern so whatever it takes to keep them healthy AND happy, well, that is what I do!

Remember, it's all about the dogs, isn't it?!
Pin It

Monday, January 18, 2010

Chewy California Fig Bars

Another treat I've always wanted to make and just hadn't yet is fig bars. I found a great recipe, Chewy California Fig Bars, that I thought suitable for the dried California figs I had on hand. So, I commenced to making them - finally!!

I must say they were most delicious and well worth the effort. They are quite chewy due to the figs, I'm sure, and had such a delightful buttery crumb crust and topping that is to die for!

As is the usual protocol, I brought the bars into work the next day for my cubemates to enjoy. They are so spoiled that the next day five different people came to my cube to see what treat I may have brought in that day!

It's interesting that after I made these and had one myself, I vaguely remember having these same creations, on occasion, as a dessert with my elementary school lunches. They may have been fig bars but I suspect they were cherry bars. And that, my friends, is the flavor bar I will bake next when I make these again!

Chewy California Fig Bars

Filling

8 oz dried figs
1 C. granulated sugar
1/2 C. hot water
1/2 C. chopped nuts

Crumb Crust and Topping:

1 C. salted butter
1 3/4 C. quick-cooking oats
1 3/4 C. flour
1 C. light brown sugar
1/2 t. vanilla
1/2 t. salt

Preheat the oven to 350 degrees (or 325 if using a glass baking dish). Have ready a 13 x 9-inch metal baking pan or glass dish.

With scissors, cut figs into small pieces. In a medium saucepan, combine the figs, sugar, water, and nuts. Heat to boiling. Reduce heat and simmer, stirring frequently, until thickened, about 10 minutes. Set aside to cool.

In a large bowl, with an electric mixer at medium-high speed, beat the butter, brown sugar, salt, and vanilla until very creamy, 2-3 minutes. With a mixing spoon, stir in the flour and oats until well blended and crumbly. Press two-thirds of this mixture evenly onto the bottom of the ungreased pan. Spread the filling over the top. Crumble the remaining crust mixture over the filling. Bake for 25-30 minutes until lightly browned. Reverse the pan from front to back once during baking. Set the pan on a wire rack to cool completely before cutting into 6 x 6 rows.

Store in the baking pan, tightly covered with aluminum foil or plastic wrap.
Pin It

Monday, January 11, 2010

New Year's Eve Dinner

I'm a little tardy in posting this but I promised I would post the recipes I used for my fabulous New Year's Eve dinner.

I had always wanted to cook a Prime Rib so I decided this would be the year to do it - a final tribute to 2009 and a grand welcoming to 2010. I searched the Internet high and low for the perfect recipe and found it in my own kitchen in Tyler Florence's first recipe book, Real Kitchen: An Indispensable Guide for Anybody Who Likes to Cook, pub. date 2003. The recipe I refer to is Horseradish And Garlic Prime Rib and I must say it is exceptionally delicious.

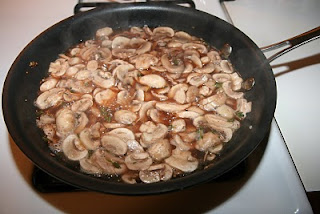
I did omit the carrots, parsnips and red onion and next time I would probably decrease the sea salt to about 1/4 cup. Other than that, it was absolutely delicious and definitley is something I will cook again. The mushrooms are a perfect addition, as well. To complete the meal, I included Twice Baked Potatoes and Steamed Asparagus.

Prime Rib:

1 (3-rib) prime rib beef roast, about 6 pounds
5 garlic cloves, smashed, plus 2 heads garlic, halved
1/2 cup grated fresh or prepared horseradish
1/2 cup sea salt
1/4 cup freshly ground black pepper
1/2 cup extra-virgin olive oil
2 carrots, peeled and chopped
2 parsnips
1 red onion, halved

Wild mushrooms:

1 tablespoon unsalted butter
Extra-virgin olive oil
2 pounds assorted mushrooms, such as cremini, oyster, shiitake, chanterelle, or white, trimmed and sliced
Leaves from 2 fresh thyme sprigs
Sea salt and freshly ground black pepper
1/2 cup Cabernet Sauvignon
1/4 cup reserved beef broth (drippings from roast) or low-sodium canned broth
1/4 cup heavy cream
1 tablespoon minced fresh chives

Directions:

Preheat the oven to 350 degrees F. Lay the beef in a large roasting pan with the bone side down. (The ribs act as a natural roasting rack.) In a small bowl mash together the garlic, horseradish, salt, pepper, and olive oil to make a paste. Massage the paste generously over the entire roast. Scatter the vegetables and halved garlic around the meat and drizzle them with a 2-count of oil. Put the pan in the oven and roast the beef for about 1 1/2 to 2 hours for medium-rare (or approximately 20 minutes per pound). Check the internal temperature of the roast in several places with an instant-read thermometer; it should register 125 degrees F. for medium-rare. Remove the beef to a carving board and let it rest for 20 minutes. The internal temperature of the meat will continue to rise by about 10 degrees. Remove the vegetables and set aside. Pour the pan juices into a fat separator or small bowl and set aside to allow the fat and beef juices to separate. Pour off and discard the fat. You will use the tasty beef juices for the mushrooms.

Place a clean skillet over medium heat. Add the butter and a 2-count drizzle of oil. When the butter starts to foam. add the mushrooms and thyme; and season with salt and pepper. Stir everything together for a few minutes. Add the red wine, stirring to scrape up any stuck bits; then cook and stir to evaporate the alcohol. When the wine is almost all gone, add the reserved beef juices. Let the liquid cook down and then take it off the heat. Stir in the cream and chives, and season with salt and pepper.

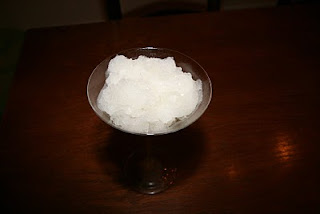
As a final course for the evening, I chose Champagne Sorbet. It had been some time since I had made this lucious frozen concoction so I felt it time to do it again! I originally found this recipe in a very old cookbook I had purchased in my hometown of Panama City. It was written by Gay Sudduth and is titled, You're Invited, pub. date 2004.

1 1/4 cups sugar
1 cup water
1 1/2 cups champagne
fresh lemon juice

Boil sugar and water 4-5 minutes (important). Cool. Stir in champagne and juice of one lemon. Freeze. Let it completely freeze over and then cut it with a knife until you can stir it. Cover and stir a couple more times before serving. Serve in small amounts.

As you can see, this was quite a meal and one which I had such fun preparing and then enjoying afterwards! If you have a special occasion coming up, I highly suggest the same menu. You won't be disappointed!
Pin It