Tuesday, June 21, 2011

Nails

As long as I can remember or at least since I was a teenager, I've always worn nail polish. I've prided myself in having nice nails and used to wear them much longer than I do now. The thing is now, it's much more difficult to keep them long! I suppose age, diet, and simple wear and tear have quite a bit to do with that. Granted, I am older and don't eat near the veggies I should and am involved in activities now such as house work and yard work which present the wear and tear I spoke of earlier!

In order to have nice nails, I have on two occasions (and, yes, I can only count two) resorted to getting acrylic nails applied which, in the end and while looking extremely nice, tend to intensify the claustrophobic part of me so much that I eventually wind up tearing them off. Which, as you probably know, only damages and weakens my own nails even further. So the vicious circle continues. I then tend to do everything I can to strengthen the nails I have and get them back into shape which is the cycle I'm in at the moment!!

While recently in my hometown of Panama City to attend my niece's wedding, my sister, myself, the bride to be and my other niece proceeded to a local nail salon the day before the wedding for manicures and pedicures.

Lo and behold, it is there where I learned of a new polish called Shellac. The picture you see is of the manicure I received on Friday, June 10th. It is 11 days later and it still looks pretty darn good if you consider I've done house work, yard work, and even weeded my vegetable garden (with gloves on, of course).

I am so incredibly impressed that I have purchased the UV light needed to "cure" the polish, as well as a base coat, top coat, and two different pink polishes so that I can do my Shellac manicures/pedicures at home. I do enjoy going to the salon and being pampered and will probably continue to do that on occasion, however, I am terribly excited about doing my own manicures/pedicures using the technique that I learned during my visit home. My salon does offer gel manicures which I believe is a harsher technique than the Shellac but that is only based on what I've read on the Internet. They may both be the same for all I know. I've never had any reactions to polishes (including Shellac polish), remover (acetone or non-acetone), acrylic nails, etc.

What I DO know is that from this point further, I shall always have perfectly manicured nails that last and have no chips!! Pin It

Sunday, June 19, 2011

Rachel Ray's Super Hot 'n Crisp Drummers or Wings and Homemade Blue Ranch

I've always wanted to make homemade wings but just haven't come across a recipe I wanted to try. That is, until I caught an episode of Rachel Ray's show a few days ago. She made these awesome hot wings and they are crispy just like I like them! So, of course, I had to try them and tonight was the night.

They are certainly awesome! I'm taking the leftovers into work tomorrow to share with my cubemate. She and I tend to do this alot these days and it saves us both from having to worry about what we'll be having for lunch!

Serves 6

3-4 pounds chicken drummers or cut chicken wings
Frying oil, such as vegetable or canola oil
Carrot and celery sticks

For the chicken coating:

1 cup cayenne pepper sauce, such as Texas Pete or Frank’s Red Hot
2 cups flour
1 tablespoon poultry seasoning
1 tablespoon sweet paprika
1/2 tablespoon dry mustard
1 teaspoon baking powder
Salt and pepper

For the ranch dipper:

1 cup sour cream
1/2 cup buttermilk
1 tablespoon lemon juice or white wine vinegar (a splash)
1 clove garlic, grated or pasted
Salt and pepper
1 cup blue cheese crumbles
3 tablespoons fresh herbs, finely chopped, such as chives, dill and parsley

Place the chicken pieces in a large stockpot and cover with water. Bring the water to a boil, par-boil for 10 minutes, then drain and pat the chicken dry.

Cool the chicken and toss it in hot sauce to coat, then toss with flour seasoned with spices to coat. Toss the chicken once more in the hot sauce and the flour. Fry in batches over medium to medium-high heat in 3 inches of hot oil, 350°F, until very crisp, 5-6 minutes.

Combine the dressing ingredients and serve as a dipper for the vegetable spears (such as carrot and celery sticks) and chicken. Pin It

Thursday, May 26, 2011

Dr. Jekyll (and Mr. Hyde)

As some of you know, my Greyhound Sami loves to "play bite" me - no one else, but me, it seems (thank God). Well, sometimes the play biting gets downright aggressive to the point that her eye's glaze over and fire spits out of them, all the while she is nipping me to the point of leaving bruises on me. And I'm usually laughing so hard because the look in her eyes is so intense and it's a clear deviation from her normal sweet self! And, of course, me laughing just antagonizes her into biting me harder!

I call it her "Dr Jekyll" episode. She is getting better about it and doesn't do it nearly as often as she did. I adopted her when she was not quite 2 years old (she's about to be 4) so I've always chalked it up to puppy behavior.

I follow Cesar Millan on Twitter and on Facebook. He recently had a suggestion on this topic that I'd like to share with you. He said to diffuse this type of behavior in puppies, try to divert their attention to performing a command ie "sit" or whatever else they might know.

None of mine are prison trained Greyhounds but I have been able to teach them all to "sit" and some to do the "down" command. Sami learned to "sit" last summer, I believe. Anyway, the last time her "Dr. Jekyll" came out, I remembered what Cesar had suggested and I immediately put my closed hand in the air and said "sit" and lo and behold, the little villain did it which then was enough to distract her and end the episode. Yeah, no bruises!!

I've done it several times since and it has worked every time. This may be old news to some of you who are actually "trainers" but to me, it is a wonderful revelation. I imagine this will work for anything your Greyhound might be doing that they shouldn't be doing. It's quite a distraction and if it can get "Dr. Jekyll" out of her trance, I imagine it will work for your Greyhound too!
Pin It

Friday, May 20, 2011

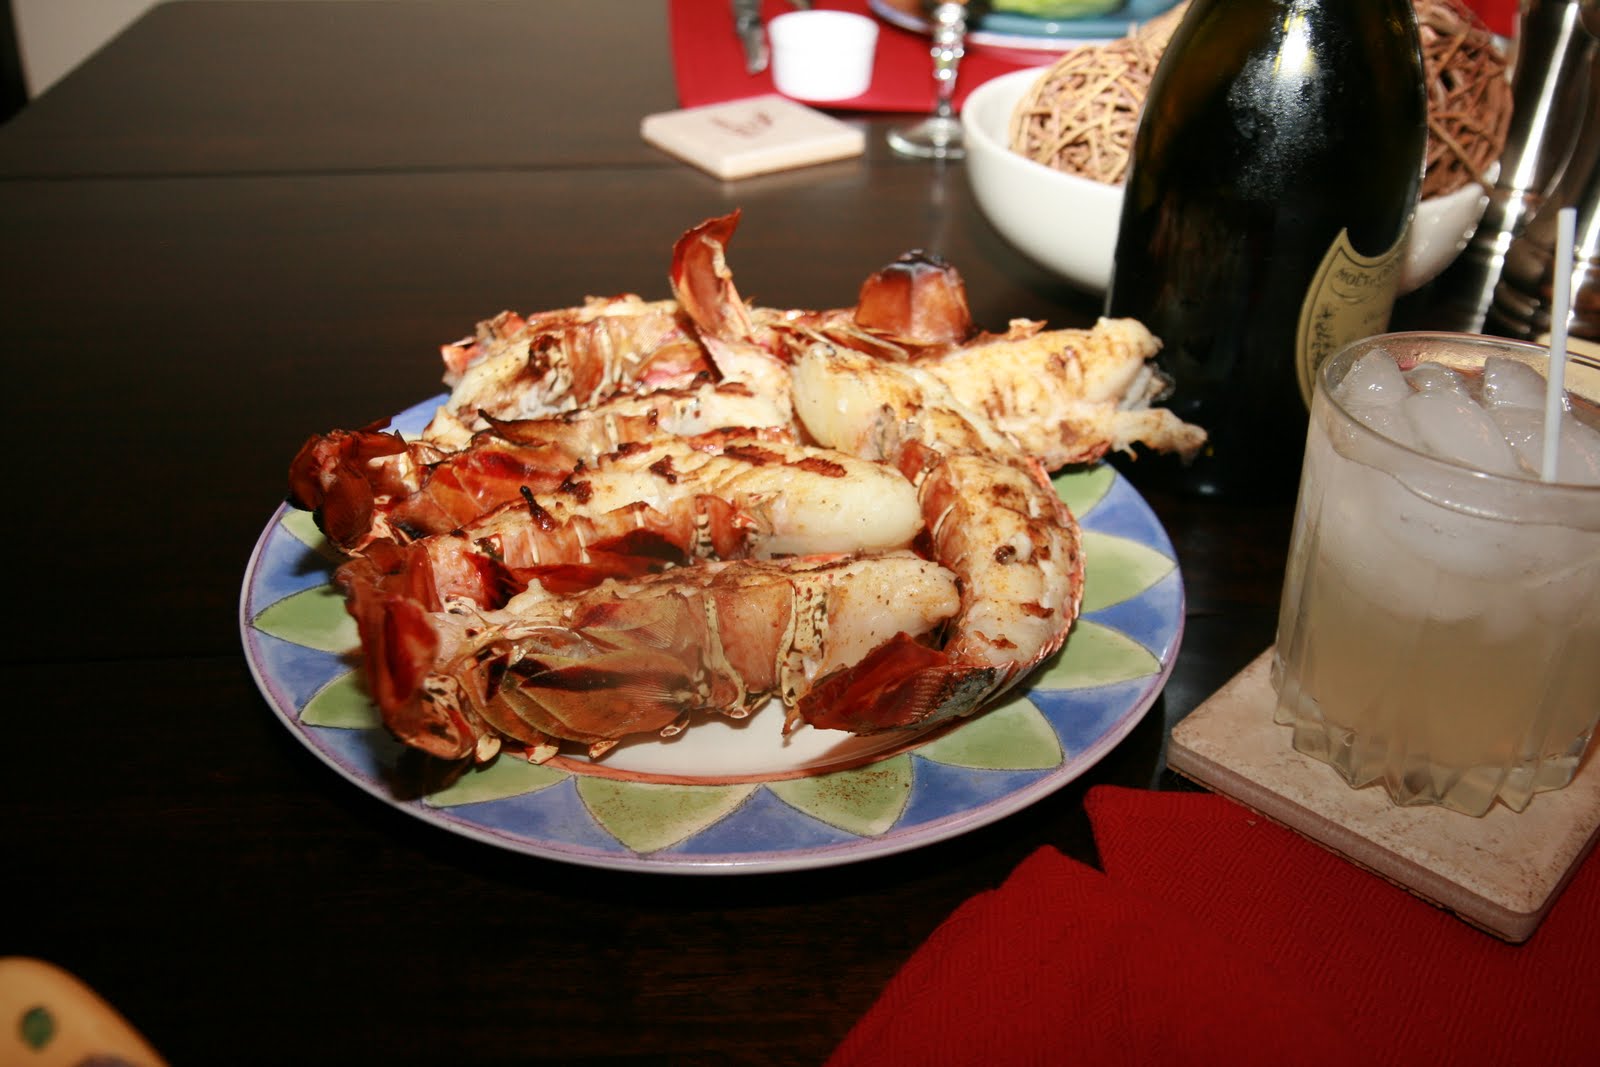
The Birthday Dinner

A few weeks back I hosted a special birthday dinner celebration for my good friend, Hank and his wife, Susan.

On the menu - Crab Crostini (appetizer), Lettuce Wedges with Homemade Blue Cheese Dressing, Grilled Lobster Tails, Baked Potatoes with all the fixin's, Steamed Asparagus, and Homemade Vanilla, Chocolate, and Strawberry ice creams.

Much to my surprise and delight, they walked in with a chilled bottle of Dom Perignon which was perfect for our planned feast! We also had Margaritas before dinner and a German white wine with dinner. All wonderfully paired with our lobster!

The recipe for the Crab Crostini follows:


Crab Crostini


Servings: 8 crostini


Ingredients


8 slices French bread, cut into 1/2-inch slices
1/2 pound fresh crab meat, or 6 and 1/2-ounces canned meat
3 tablespoons minced green onion
1 tablespoon fresh lemon juice
2 tablespoons mayonnaise
2 teaspoons garlic, minced
1/2 teaspoon Dijon mustard
Cayenne pepper, to taste
Ground white pepper, to taste
Salt, to taste
1 cup Parmesan or Romano cheese, grated
Fresh chives, for garnish (optional)


Instructions


1. Preheat the broiler on your oven.
2. On a baking sheet, line the French bread pieces about 1-inch apart.
3. In a large bowl, combine the crab meat, green onions, lemon juice, mayonnaise, garlic, mustard, cayenne pepper, white pepper, and salt. Mix well.
4. Lightly toast the bread slices under the broiler until lightly golden, about 4-5 minutes.
5. Remove the bread from the oven, and flip all the bread slices over to the other side.
6. Top each bread slice with about 1-2 tablespoons of the crab mixture (your desired amount).
7. Sprinkle the cheese over the top of each crostini evenly.
8. Broil the crostinis until the cheese is melted and lightly browned, about 4-5 minutes (depending on your broiler temperature).
9. Garnish with fresh chives and serve immediately.


Other recipes used include the Blue Cheese Dressing recipe I previously posted and blogged about, http://patemarie.blogspot.com/2010/07/blue-cheese-dressing.html. This is the Trisha Yearwood recipe and it is to die for!!

The lobster were cut in half, generously sprayed with drawn butter then sprinkled with garlic powder, onion powder, seasoned salt, Old Bay Seafood seasoning, fresh cracked black pepper and fresh ground sea salt. Then on the grill they went for approximately 10-12 minutes. Of course, once ready, they were served with drawn butter.

The ice creams were normal ice cream recipes except the strawberry was a Buttermilk Strawberry ice cream recipe. I'll post that one shortly with a picture. It well deserves the spotlight in its own post!

Overall, the dinner was quite a culinary success and I dare say that Hank had a wonderful birthday week!!
Pin It

Wednesday, March 23, 2011

Kids, Books, and a Greyhound!

And a beautiful quilt but I'll get to that in a little bit!

As some of you may know, I've had Greyhounds since 2003 when I first adopted Reminisee Blair now known as Remi. Shortly thereafter came PB's Honey Fritz now known as Sugar, then Yopon Laverne now known as Lucy, and lastly Oakland Scarboro now known as Sami. The latter being a total "uh oh" as she was definitely not planned but that, my friends, is an entirely different blog post!

So, when you have dogs, you like to include them in activities, right? The old mantra - a tired dog is a happy dog holds true in my household, that's for sure! Well, I've done lure coursing with Remi, Sugar (who was #4 in Greyhounds in 2005), Lucy, and Sami. I've also participated in pet therapy with all four. Pet therapy is where we visit nursing homes and children's hospitals with our Greyhounds. The patients and children just love loving on the dogs. We all know that therapy using pets is quite beneficial for our health. For those in nursing homes, it is known to:
  • Diminish emotional pain
  • Diminish physical pain
  • Reduce boredom
  • Reduce anxiety
  • And it makes people happy


For children, therapy with pets teaches them:
  • Gentleness
  • Caring
  • Responsibility
  • How to interact safely with an animal, and most importantly,
  • Allows them to love an animal
Researchers found even one 30-minute long session of animal assisted therapy reduced loneliness to a statistically significant degree. Journal of Gerontology: Medical Sciences, 7/02. Pets provide internal chemical therapeutics for people. Tests show that within minutes of petting a dog, the humans and dogs alike experience massive release of such beneficial hormones as prolactin, oxytocin and phenylethylamine.

So, with all this being said, I have been very active in pet therapy since adopting my first Greyhound in 2003. We've certainly enjoyed our experiences and most every month, the patients at the nursing home crack me up with something they say or do. They know us and we know them and when we see an empty bed, it truly is a very sad moment. Our only hope and thought is that a new patient will reside in that room who will enjoy our visits as much as the last patient.

At one visit many years ago, we stopped in the hallway and chatted with a woman who was trying to tell me about her day. Afterwards, a nursing assistant stopped me to ask what we had done because this particular patient hadn't spoken a word in over 6 months. Of course, it was nothing we did specifically but I suspect having the Greyhounds spurred some memory for this particular patient. Perhaps she had had dogs of her own in the past and seeing them made her remember them fondly and, quite frankly, come to life right before our eyes. It was quite a thing knowing we had a small part in helping that patient "reconnect", for lack of a better word. I will never forget it, that's for sure.

Another form of therapy using our dogs is called R.E.A.D. (Reading Education Assistance Dogs). This is where trained R.E.A.D. teams visit schools and libraries and serve as reading companions for children. The program is very successful with proven results by increasing reading test scores and improving reading levels for children of all ages. It works because the children aren't intimidated by reading to a dog as they sometimes can be reading to an adult or teacher. The dog does not criticize or judge the child. The program increases their self-esteem, thus making the children enjoy the reading experience.

So, Lucy and I embarked on this next journey by completing the necessary training and registering as a R.E.A.D. team. In Georgia our program is called Reading Paws. We then started searching for a library who would welcome our program with open arms. We found that with the Smyrna Public Library.

Our very first visit was March 19th. Lucky for us, our entire hour was filled with appointments made by four children. The first to read to Lucy was a little boy named Varun. He is from India, I believe, and if there was ever a very animated and enthusiastic reader, this is Varun. It was quite comical but you could tell he loved to read and loved reading to Lucy. After Varun was done, a little boy from Africa read to Lucy. He had a bit more difficulty but he did pretty well for a child his age. The book he chose was a difficult one, I think. Next time, we'll get one that is a bit easier for him. Then a Mexican girl read to Lucy. She was a really good reader. By this time, the hound in Lucy had come out and she was sprawled out on the blanket fast asleep. I told the children that Lucy was listening and was just resting her eyes. The last child was the best friend of the first Mexican girl. She also was an excellent reader. I believe three of these children have signed up for every session until June or so and we will be there two Saturdays a month. Whoo hoo!!

What an excellent start to what I foresee to be a wonderful journey with kids, books and a Greyhound!!

Oh, I cannot forget to mention the beautiful quilt my sister made for us (see picture above). We were very lucky to have Brooke Shenson of ShopMollyd fame donate several Greyhound appliqués which my sister included on the four corners of the quilt. With the largest appliqué that Brooke sent, Pam made a most awesome quilted bag that I will use to transport the quilt to and from the library. Obviously we will use the quilt to sit on while the children read. It is absolutely a stunning piece of art!! I am very proud of the quilt and thank my sister profusely for dedicating her time and talent to the cause. We truly appreciate it and will take very good care of my new artwork! Pin It

Monday, March 14, 2011

Themed Dinners!

As you probably have guessed by now, I really enjoy hosting themed dinners! I always have!! And this past weekend was no exception. With it being Mardi Gras last week, I decided to cook an entire meal based on Cajun recipes.

We enjoyed Shrimp and Sausage Jambalaya, Shrimp Creole, Red Beans and Rice, Corn Muffins and for dessert, a delicious Bread Pudding. Oh, and I cannot forget the Hurricanes to drink!!

Everything was very good, even if I say so myself. The Jambalaya recipe is courtesy of my favorite food blogger, Brown-Eyed Baker. The Corn Muffins recipe is from my cubemate at work and the Bread Pudding was Paula Deen's recipe, of course!! The Shrimp Creole is my recipe and the Red Beans and Rice came from Southern Living. Oh, and the Hurricanes, from an online source!

I couldn't have been more pleased with how everything turned out and I think my guests also enjoyed the dinner.

Hurricane Drink

1 oz vodka
1/4 oz grenadine syrup
1 oz gin
1 oz light rum
1/2 oz Bacardi 151 Rum
1 oz amaretto almond liqueur
1 oz triple sec
grapefruit juice
pineapple juice

Pour all but the juices, in order listed, into a hurricane glass three-quarters filled with ice. Fill with equal parts of grapefruit and pineapple juice. Garnish with a half orange slice and maraschino cherry "flag".


Shrimp and Sausage Jambalaya

Serves: 6 to 8

1 tablespoon olive oil
1 pound sausage, kielbasa or andouille, sliced
1 pound smoked ham, cubed
1 tablespoon butter
1 medium onion, diced
1 cup diced celery
1 green bell pepper, cored and diced
1 red bell pepper, cored and diced
1 cup seeded and diced tomato
3 garlic cloves, minced
1 jalapeno pepper, seeded and minced OR ½ teaspoon cayenne
2 teaspoons diced fresh oregano
1 teaspoon diced fresh thyme
2 tablespoons tomato paste
6 cups chicken stock
3 cups long-grain rice, rinsed
3 bay leaves
2 teaspoons coarse salt
1 teaspoon freshly ground black pepper
6 to 8 dashes hot sauce, optional
½ cup chopped scallions, divided
¾ cup chopped fresh parsley, divided
¼ cup freshly squeezed lemon juice
1 pound medium shrimp, deveined (20 to 24 count)

1. Heat the oil in a large Dutch oven over medium heat, add the kielbasa and saute for 8 to 10 minutes, until browned. Remove the kielbasa to a bowl, and set aside.
2. Add the ham to the same pot and cook 8 to 10 minutes, until lightly browned. Remove to the bowl with the kielbasa, and set aside.
3. Add the butter, onion, celery and peppers to the same pot and saute for 8 to 10 minutes, until the onion is translucent.
4. Add the tomato, garlic, jalapeno or cayenne, oregano, thyme, and tomato paste and cook until all the vegetables and herbs are blended well.
5. Add the stock and bring to a rolling boil. Stir in the rice, and add the sausage, ham, bay leaves, salt, pepper and hot sauce. Return to a boil, reduce the heat to low and simmer, covered, for 20 minutes.
6. Add ¼ cup of the scallions, ¼ cup of the parsley, the lemon juice and the shrimp, and stir well. Cover the pot, remove it from the heat and allow the jambalaya steam, for 15 minutes, before serving.
7. Garnish with the remaining ¼ cup scallions and ½ cup parsley, and a dash of hot sauce, if desired.

(Recipe adapted from Barefoot Contessa)


Red Beans and Rice

Serves: 8-10

1 pound dried red beans
1 pound Andouille
sausage, thinly sliced
3 celery ribs, chopped
1 green bell pepper, chopped
1 red bell pepper, chopped
1 sweet onion, chopped
3 garlic cloves, minced
1 tablespoon Creole seasoning
Hot cooked long-grain rice
Hot sauce (optional)
Garnish: finely chopped green onions, finely chopped red onion


1. Combine first 8 ingredients and 7 cups water in a 4-qt. slow cooker. Cover and cook on HIGH 7 hours or until beans are tender.
2. Serve red bean mixture with hot cooked rice, and, if desired, hot sauce. Garnish, if desired.


Shrimp Creole

Serves: 6 to 8

2 quarts water
2 pounds shrimp unpeeled
1 cup onion chopped

1 cup green bell pepper, chopped
1 tablespoon vegetable oil
2 14 oz cans tomatoes, drained and chopped
1 6 oz can tomato paste
1 bay leaf
1 teaspoon Worcestershire sauce

1/2 teaspoon dried oregano

1/4 teaspoon salt

1/2 teaspoon lemon pepper

1/4 teaspoon pepper
da
sh red pepper
2 cups cooked rice

1. Bring water to a boil in a large Dutch oven; add shrimp and cook 3 to 4 minutes. Drain well; rinse with cold water. Chill. Peel and de-vein shrimp.
2. Saute onion and green pepper in oil. Drain. Combine tomatoes, tomato p
aste, bay leaf, Worcestershire, oregano, salt, lemon pepper, pepper, and red pepper in large Dutch oven.
3. Add green pepper and onion. Simmer over low heat for about 45 minutes. Add shrimp and simmer until shrimp are heated.
4. Ladle hot shrimp creole over hot white rice.

Cornbread

2 packages Jiffy Cornbread Mix
5 eggs
½ cup sour cream low fat
3/4 cup milk (would go with less than that)
1 15-oz can cream corn

Preheat oven to 350 F., grease a 9 x 13 pan or muffin pan.

Mix eggs. Add sour cream until blended. Add milk to eggs and sour cream until blended.
Add cream corn to mixture. Gradually add in cornbread mixes until blended, but still may have lumps. Pour into greased pan.

Bake approximately 30-40 minutes (or more) until a toothpick comes out clean in the middle. Top should be golden brown.

Let cool at least 10 minutes before serving.

Bread Pudding


Serves: 8 to 10

2 cups granulated sugar
5 large beaten eggs
2 cups milk
2 teaspoons pure vanilla extract
3 cups cubed Italian bread, allow to stale overnight in a bowl
1 cup packed light brown sugar
1/4 cup (1/2 stick) butter, softened
1 cup chopped pecans

For the sauce:

1 cup granulated sugar
1/2 cup (1 stick) butter, melted
1 egg, beaten
2 teaspoons pure vanilla extract
1/4 cup brandy

1. Preheat the oven to 350 degrees F. Grease a 13 by 9 by 2-inch pan.
2. Mix together granulated sugar, eggs, and milk in a bowl; add vanilla. Pour over cubed bread and let sit for 10 minutes.
3. In another bowl, mix and crumble together brown sugar, butter, and pecans.
4. Pour bread mixture into prepared pan. Sprinkle brown sugar mixture over the top and bake for 35 to 45 minutes, or until set. Remove from oven.

For the sauce:
Mix together the granulated sugar, butter, egg, and vanilla in a saucepan over medium heat. Stir together until the sugar is melted. Add the brandy, stirring well. Pour over bread pudding. Serve warm or cold.

Pin It

Friday, March 11, 2011

An Italian Feast

A few weeks back I hosted a dinner party where Italian was the theme! And who doesn't love an authentic Italian meal?

We started with Arancini di Riso as an appetizer, then a nice Caesar Salad and crunchy Cheesy Garlic Bread, then the most awesome Lasagna I've ever made (complete with homemade noodles), followed by New York Style Cheesecake with Strawberries! Yes, it was all so delicious.

Here are the recipes! I didn't include the noodle recipe as that is just an egg noodle dough. I believe it's on my blog from a previous posting!

Arancini di Riso
(Rice Balls with Marinara Sauce)

Serves 6

2 eggs
2 cups cooked rice
4 oz. mozzarella cheese, cut in ½-inch cubes (about 1 cup)
¾ cup seasoned bread crumbs
2 Tablespoons olive oil

Line a baking sheet with parchment paper.

Beat eggs lightly with fork. Add the rice and stir gently but thoroughly.

Take 1 tablespoon of the mixture, place a cube of mozzarella in the middle and then top with another tablespoon of rice. Shape into a ball and roll in the breadcrumbs. Place on parchment-lined baking sheet. Repeat with the rest of the rice mixture.

Refrigerate pan of rice balls for at least 30 minutes.

Meanwhile, preheat oven to 425°F. Drizzle 2 tablespoons of olive oil over rice balls.

Bake in the preheated oven for 20 to 25 minutes, or until golden brown. Serve with warm marinara sauce.

World's Best Lasagna


Serves 10

1 pound sweet Italian sausage
3/4 pound lean ground beef
1/2 cup onion minced
2 cloves garlic crushed
28 ounces crushed tomatoes
12 ounces tomato paste
13 ounces tomato sauce
1/2 cup water
1 1/2 teaspoons dried basil
1/2 teaspoon fennel seeds
1 teaspoon italian seasoning
1 teaspoon salt
1/4 teaspoon ground black pepper
4 tablespoons chopped parsley
12 lasagna noodles
16 ounces ricotta cheese
1 egg
1/2 teaspoon salt
3/4 pound mozzarella cheese sliced
3/4 cup grated Parmesan cheese

Instructions:

In a Dutch oven, cook sausage, ground beef, onion, and garlic over medium heat until well browned. Stir in crushed tomatoes, tomato paste, tomato sauce, and water. Season with sugar, basil, fennel seeds, Italian seasoning, 1 tablespoon salt, pepper, and 2 tablespoons parsley. Simmer, covered, for about 1 1/2 hours, stirring occasionally.

Bring a large pot of lightly salted water to a boil. Cook lasagna noodles in boiling water for 8 to 10 minutes. Drain noodles, and rinse with cold water. In a mixing bowl, combine ricotta cheese with egg, remaining parsley, and 1/2 teaspoon salt.

Preheat oven to 375 degrees F (190 degrees C).

To assemble, spread 1 1/2 cups of meat sauce in the bottom of a 9x13 inch baking dish. Arrange 6 noodles lengthwise over meat sauce. Spread with one half of the ricotta cheese mixture. Top with a third of mozzarella cheese slices. Spoon 1 1/2 cups meat sauce over mozzarella, and sprinkle with 1/4 cup Parmesan cheese. Repeat layers, and top with remaining mozzarella and Parmesan cheese. Cover with foil: to prevent sticking, either spray foil with cooking spray, or make sure the foil does not touch the cheese.

Bake in preheated oven for 25 minutes. Remove foil, and bake an additional 25 minutes. Cool for 15 minutes before serving.


New York Style Cheesecake

Serves 16

1 1/4 cups HONEY MAID Graham Cracker Crumbs
1/4 cup butter, melted
5 (250 g) packages PHILADELPHIA Brick Cream Cheese, softened
1 cup sugar
3 tablespoons flour
1 tablespoon vanilla
1 cup sour cream
4 eggs
1 (19 ounce) can cherry pie filling (I substituted fresh strawberries)

Instructions:

Heat oven to 325 degrees F if using a silver 9 inch springform pan (or to 300 degrees F if using a dark nonstick 9-inch spring-form pan). Mix crumbs and butter; press firmly onto bottom of pan. Bake 10 minutes.

Beat cream cheese, sugar, flour and vanilla in large bowl with electric mixer on medium speed until well blended. Add sour cream; mix well. Add eggs, one at a time, mixing on low speed after each addition just until blended. Pour over crust.

Bake 1 hour 10 minutes or until center is almost set. Run knife or metal spatula around rim of pan to loosen cake; cool before removing rim of pan. Refrigerate 4 hours or overnight. Top with pie filling before serving. Store leftover cheesecake in refrigerator. Pin It

Sunday, March 06, 2011

Yummy - Homemade Pancakes

I recently came across a very awesome blog about one of my favorite subjects - cooking!! It's called Brown Eyed Baker. A read her blog religiously as she has some very awesome recipes.

This one came across her blog the other day. I have to say I like pancakes but don't make them at home that often but this recipe just called out to me to try it! And so I did! She was right, they are the very best pancakes I think I've ever eaten. Worth a try everyone!


Best Buttermilk Pancakes

Yield: Sixteen 4-inch pancakes

Prep Time: 20 minutes | Cook Time: 15 minutes

2 cups all-purpose flour
2 tablespoons granulated sugar
1 teaspoon baking powder
½ teaspoon baking soda
½ teaspoon salt
2 cups buttermilk
¼ cup sour cream
2 eggs
3 tablespoons unsalted butter, melted and cooled slightly
1 to 2 teaspoon vegetable oil, for greasing the pan

1. Whisk the flour, sugar, baking powder, baking soda and salt together in a medium bowl. In a second medium bowl, whisk together the buttermilk, sour cream, eggs and melted butter. Make a well in the center of the dry ingredients and pour in the wet ingredients; gently stir until just combined (batter should remain lumpy with a few streaks of flour). Do not overmix. Allow the batter to sit for 10 minutes before cooking.

2. Heat 1 teaspoon of the vegetable oil in a nonstick skillet over medium heat until shimmering. Using a paper towel, carefully wipe out oil, leaving a thin film of oil on the bottom of the pan. Using ¼ cup measure, portion batter into pan in 4 places. Cook until edges are set, first side is golden brown, and bubbles on surface are just beginning to break, 2 to 3 minutes. Using a thin, wide spatula, flip pancakes and continue to cook until second side is golden brown, 1 to 2 minutes longer. Serve pancakes immediately. Repeat with remaining batter, using remaining oil as needed.

*Note 1: This recipe was formulated using lower-protein flour such as Pillsbury and Gold Medal. If you use flour with a little higher protein content like King Arthur, you will need to add 1 to 2 more tablespoons of buttermilk. I forgot about this at first, and when I mixed the batter I saw how thick it was. I added 1½ more tablespoons of buttermilk and the batter was perfect.

*Note 2: If you make these on an electric griddle, preheat it to 350 degrees F.

(Recipe adapted from Cook’s Illustrated)

Pin It

Friday, February 11, 2011

An Evening With Williams and Sonoma

This past Tuesday evening I attended my first cooking class at a local Williams and Sonoma store. This is a treat I've dreamed of doing for many years and I am so thrilled that I finally decided to do it! Of course I like to think I can cook but you know you can ALWAYS learn something from the professionals.

One of the first things that our instructor, Anne Terrell shared with us was that she hoped that each and every one of us would learn at least one new thing during the class. She also shared some of her background accented with the fact that she graduated from a local culinary school and has worked as a chef in various restaurants around Atlanta, before landing at Williams Sonoma. It's obvious she loves what she is doing.

Our class was titled "Simple Yet Sophisticated Dinner Party" with the description - "This memorable meal is sure to impress your guests, yet you won't need to spend all day preparing it." The original menu:

Romaine, Gorgonzola and Walnut Salad
Pork Chops with Garlic and Herbs
Bittersweet Chocolate Cake

Ms. Terrell, instead showed us how to prepare:

Romaine, Gorgonzola, Grape and Walnut Salad (has a wonderful walnut vinaigrette dressing)
Pork Chops with Garlic and Herbs
Potato Pancake
Glazed Carrots
Strawberry Tart with Orange Cream

Everything was just wonderful, very tasty, and well presented. We were truly impressed with how Ms. Terrell cooked and prepared every dish in the make-shift kitchen in the Williams Sonoma store using an All-Clad counter-top grill, a convection oven, and stove top. Well, and she did have the best of the best available to her at any given time so I imagine that helped!

A few takeaways for me:

- using a ceramic knife will prevent fruits and vegetables from browning (oxidizing) because it's blade is nonreactive. Who knew? (I'll be getting my set next month)
- a juicer is a must-have item for any home cook (I'll be getting mine next month)
- and lastly, sparkling water is most awesome!! They served this to us during our class. I watched to see where it was coming from and they were making it from a SodaStream machine. I went to Bed, Bath, and Beyond the next night and purchased one for myself!! I love it!!

Ms. Terrell conducted the class with ease and even though she used WS products, she didn't overly promote them which was refreshing. Overall, I was very impressed with the entire class, so impressed that I signed up for the next four classes!! I can hardly wait until March when we will be doing "Brunch Favorites" which includes a menu of Very Berry Smoothies, Strata with Asparagus, Sausage and Fontina, Apple Pancakes, and Brown Sugar Macadamia Nut Coffee Cake!

- Posted using BlogPress from my iPad Pin It

Wednesday, February 02, 2011

His Special Day!!

Today is Groundhog Day and in his honor (and more especially so that we impress him so he brings Spring on really fast) we annually hold a bash at work in his honor. Again, just another excuse to make goodies for the co-workers!!

My contributions for the day include Wonton Tacos (yes, an oxymoron but delicious nonetheless) and Groundhog Cupcakes. For the Wonton Tacos, I simply browned some ground round, added hot taco seasoning and chopped jalapenos. Then I took Wonton wrappers and put them in my mini-muffin pan filling them full of the cooked hamburger mixture. Then topped with cheese and baked for 10 minutes in a 350 degree oven. That's it although next time I will get tomato and lettuce to top them with just before serving. That would make a complete taco!

As for the Groundhog Cupcakes, here are the recipes. I used Martha's recipe for the cupcakes and the Swiss Meringue Buttercream recipe for the icing.

White Cupcakes (by Martha Stewart)

Makes 3 dozen
  • 4 1/2 cups sifted cake flour (not self-rising)
  • 2 tablespoons baking powder
  • 3/4 teaspoon salt
  • 1 1/2 cups milk
  • 1 tablespoon pure vanilla extract
  • 1 cup plus 2 tablespoons (2 1/4 sticks) unsalted butter, softened
  • 2 1/4 cups sugar
  • 7 large egg whites

Directions

  1. Preheat oven to 350 degrees. Line cupcake or muffin tins with papers; set aside. Into a medium bowl, sift together cake flour, baking powder, and salt. Combine milk and vanilla in a glass measuring cup.
  2. Place butter in the bowl of an electric mixer fitted with the paddle attachment, and beat until pale and creamy. With mixer on medium speed, gradually add sugar in a steady stream; continue beating until light and fluffy, about 3 minutes. Reduce speed to low.
  3. Add flour mixture to butter mixture in three batches, alternating with the milk mixture and starting and ending with the flour. Do not overbeat.
  4. In a clean bowl of electric mixer fitted with the whisk attachment, beat egg whites on medium-high speed until stiff peaks form. Fold one-third of the whites into flour mixture to lighten. Fold in remaining egg whites in two batches, being careful not to deflate the whites.
  5. Pour batter into prepared tins, filling cups to about 1/2 inch from the tops. Bake until a cake tester inserted near the centers comes out clean and the tops spring back when pressed lightly in the center, 18 to 20 minutes. Remove from oven; let cool completely before icing or storing.
Swiss Meringue Buttercream for Cupcakes (by Martha Stewart)

Ingredients

Makes about 9 cups, enough for about 28 cupcakes

  • 2 1/2 cups sugar
  • 10 large egg whites
  • 4 cups (8 sticks or 2 pounds) unsalted butter, cut into pieces
  • 2 teaspoons pure vanilla extract

Directions

  1. Place sugar and egg whites in the heat-proof bowl of an electric mixer. Set bowl over a pan of gently simmering water, and whisk until sugar has dissolved and egg whites are hot to the touch, about 3 minutes. Test by rubbing the mixture between your fingers; it should feel completely smooth.
  2. Transfer bowl to mixer stand. Using the whisk attachment, beat on high speed until mixture has cooled completely and formed stiff and glossy peaks, about 10 minutes.
  3. Add the butter, one piece at a time, and beat until incorporated after each addition. Don't worry if the buttercream appears curdled after all the butter has been added; it will become smooth again with continued beating. Add vanilla, and beat just until combined.
  4. Switch to the paddle attachment, and beat on the lowest speed to eliminate any air pockets, about 5 minutes. If using buttercream within several hours, cover bowl with plastic wrap, and set aside at room temperature in a cool environment. Or transfer to an airtight container, and store in the refrigerator, up to 3 days. Before using, bring buttercream to room temperature, and beat on the lowest speed with the paddle attachment until smooth, about 5 minutes.
Now, for decorating the cupcakes. Here are those instructions:

Ingredients
  • Baked cupcakes
  • Almond Joy candy
  • White frosting
  • White jelly beans
  • Black decorators' gel
  • Watermelon slice candy
  • Brown M&M's Minis
  • Chocolate cookie
Remove a piece of cake the width of an Almond Joy candy from the center of a baked cupcake. Set the candy upright in the hole, then spread a layer of white frosting on the cupcake.

For the groundhog's eyes, trim the ends from a white jelly bean, stick them in place with frosting, then dot them with black decorators' gel. Add a tiny triangle cut from a watermelon slice candy for a nose, brown M&M's Minis for ears and cheeks, and a tiny rectangular piece of white jelly bean for teeth. Sprinkle chocolate cookie crumbs around the partially emerged groundhog, and he's ready to greet his fans. Pin It

Saturday, January 22, 2011

Chili - Perfect This Time of Year!


With temps hovering in the mid-20's for days now and snow forecasted again in Atlanta this week, I thought it best to cook up another pot of homemade Chili. Nothing warms the body and soul like Chili. It is just perfect, especially this time of year.

Here's my recipe:

Chili

1 1/2 pounds ground round
1/2 cup onion, chopped
1/2 cup green pepper, chopped
4 cloves garlic, minced
2 28-oz cans diced tomatoes
1 15-oz can tomato sauce
1 cup water
2 tablespoons chili powder
2 teaspoons cumin
1 teaspoon salt
1/2 teaspoon oregano
1 teaspoon red pepper
1 teaspoon black pepper
3 15-oz cans dark red kidney beans, drained

Place a large skillet over medium heat until hot. Add 1 tablespoon olive oil. Add ground round, onion, pepper, and garlic. Cook until beef is browned, stirring to crumble meat. Drain. Add tomatoes and next 8 ingredients, stir well. Bring to a boil; reduce heat and simmer uncovered 15 minutes or so. Stir in beans. Simmer until beans are heated thoroughly. Enjoy! Pin It

Thursday, January 13, 2011

The Commute

Well, we are on our way to work once again, in the frozen tundra now known as Georgia. The roads aren't bad at all. But we are on the Interstate so that's the difference, I guess. Surface streets are still pretty bad.

Yesterday when I left my home I slid down my driveway. Really fast, too. I bounced and ended up almost in my neighbor's front yard. It was pretty scary. No damage to my vehicle which is good and I also narrowly missed the telephone pole which, again, is good. This morning it was dry so no problems at all, however, when I got to Hank's (my carpool buddy) house, I parked my Pilot, gathered my belongings, and got out of the vehicle. I walked maybe four feet and promptly was on my ass. His driveway was pretty icy and I hit a patch just right. Short of a pretty sore elbow, I'm none the worse for wear. Nothing that a bottle of German wine won't cure.

The biggest hazard I've seen on the highway, thus far, seems to be the ice falling off 18-wheelers and other assorted vehicles. It seems quite dangerous. Sort of like those ice javelins we saw on the news that were falling from that tower in the parking lot in Mississippi. Really scary.

And then there is the exit ramp at I-85 and Clairmont Road. Yesterday it was pretty bad. Ah, and today, it's fine. They put sand out, it seems. Oh and there is the parking lot at work. Yesterday it was a sheet of ice. Security came and picked me up and drove me to the sidewalk. They had a bobcat out when we left, scraping the ice up, little by little. Today, they are still out here with the bobcats. Well, wish me luck. We're about to get out and try the trek to the front door.

- Posted using BlogPress from my iPad
Pin It

Wednesday, January 12, 2011

Shepherd's Pie

Today after the last several days of snow and ice we've endured here in Atlanta, I was pondering what to make for dinner and Shepherd's Pie came across my mind. I can't think of a more comforting and warm meal to have in this God awful weather. So, on my way home from work today (and, yes, I did make it to the office), I stopped at Publix to purchase the necessary ingredients. And wa la, what a wonderful filling meal it was. Of course I'll have leftovers for weeks to come but that's okay, that means less time in the kitchen, too!! Enjoy!


Cheddar-Topped Shepherd's Pie (from MarthaStewart.com)
  • 2 pounds baking potatoes (about 4), peeled and thinly sliced
  • Coarse salt and ground pepper
  • 1 tablespoon vegetable oil, such as safflower
  • 6 medium carrots, halved lengthwise, quartered if large, and thinly sliced
  • 6 celery stalks, thinly sliced
  • 1 large onion, chopped
  • 1/2 teaspoon dried thyme
  • 1/4 cup all-purpose flour
  • 1/4 cup tomato paste
  • 2 pounds ground beef chuck
  • 1 cup whole milk
  • 1 1/2 cups shredded sharp white cheddar (6 ounces)
Directions
  1. Preheat oven to 450. Place potatoes in a large saucepan, and cover by 1 inch with salted water. Bring to a boil; reduce to a simmer. Cook until potatoes are easily pierced with the tip of a paring knife, 15 to 20 minutes.
  2. Meanwhile, heat oil in a 5-quart Dutch oven or heavy pot over medium-high. Add carrots, celery, onion, and thyme. Cook, stirring occasionally, until vegetables are tender, 8 to 10 minutes. Add flour and tomato paste; cook, stirring, 1 minute. Add beef; cook, stirring occasionally, until no longer pink, 6 to 8 minutes. Add 1 cup water; bring to a boil, and simmer 1 minute. Set beef filling aside.
  3. Drain potatoes; return to pan. Cook over medium, stirring, until liquid has evaporated and a thin film covers bottom of pan, about 1 minute. Remove pan from heat; add milk and 1 cup cheese. Mash until smooth; season cheddar-potato topping with salt and pepper.
  4. Pour beef filling into a 13-by-9-inch baking dish. Drop dollops of topping over filling; spread to edges with a spatula. Using a fork, make decorative peaks; sprinkle with remaining 1/2 cup cheese. Bake until topping is browned and filling is bubbling rapidly, about 20 minutes (if topping and filling were chilled, increase to 35 minutes). Let stand 5 minutes before serving.
Pin It